Disable Raspbian to get black screen after 10 minutes

So when i was setup a Raspberry Pi on a TV to show a webpage i find that Raspbian haved some kind of timeout that was making the TV to go dark after 10 minutes.

After a while searching i find that there is differents way to fix this in differnt versions but i run Raspbian Buster in the beginning of february 2020 and i tested a lot of things before i got it to not be black screen after 10 minutes.

To fix this you need to edit the file named /etc/xdg/lxsession/LXDE-pi/autostart with your chose of text editor and i change it to look like:

@lxpanel --profile LXDE-pi
@pcmanfm --desktop --profile LXDE-pi
@xset s noblank
@xset -dpms s off

The two first lines is default lines to get the desktop to start but the last two is to disable the black screen that shows up after 10 minutes.

In the default file there is a line about xscreensaver that i removed.

Reboot the Raspberry Pi and wait and now i should not be black screen anymore.

Raspberry Pi – Show website in fullscreen on TV

A client was like to show some images on a TV and i try to find a good solution with Raspberry Pi and after tested some i selected to go with setup a Raspberry Pi with Raspbian open up a Chromium webbrowser in fullscreen mode on startup.

This sounds easy but there was a couple of things i find out on the way to get a stable and working version of this project.

The webpage i built my self and not going to include in this post i only whant to write down what i find around Raspbian and the setup to get all stable.

Here is the different steps to setup Raspbian right:

1. Wifi setup

I used a Raspberry Pi 3 B+ with built in wifi but to get it up on the wifi without any keyboard i configure the wifi setup on the SD-Card.

Read my old post about this here.

2. Enable SSH

Read my old post about this here.

3. Clean up Raspbian

The non-lite version of Raspbian comes with quite a few things that are not needed for a Kiosk-style display which bloat the install.

They can be removed, after which an autoremove will take care of any dangling dependencies:

sudo apt-get remove --purge wolfram-engine scratch nuscratch sonic-pi idle3 smartsim java-common minecraft-pi python-minecraftpi python3-minecraftpi libreoffice python3-thonny geany claws-mail bluej greenfoot

sudo apt-get autoremove

4. Ensure everything is up-to-date

Run this commands to make sure your raspbian is up-to-date:

sudo apt-get update
sudo apt-get upgrade
sudo apt-get dist-upgrade

5. Install Chrome and unclutter

We need chromium-browser as well as unclutter (to hide the cursor).

sudo apt-get install unclutter chromium-browser

6. Automatically start Chrome and disable black screen shows up after 10 minutes

Change the file ~/.config/lxsession/LXDE-pi/autostart to look like:.

@lxpanel --profile LXDE-pi
@pcmanfm --desktop --profile LXDE-pi
@xset s noblank
@xset -dpms s off

@sed -i 's/"exited_cleanly": false/"exited_cleanly": true/' ~/.config/chromium-browser Default/Preferences
@chromium-browser --noerrdialogs --kiosk http://www.google.com --incognito --disable-translate

The first 2 lines is to get the desktop to start.

The 3th and 4th line is to disable black screen after 10 minutes

The 5th line is to ensures chromium thinks it shut down cleaning, even if it didn’t to prevent tab restore warnings.

The 6th line is to start the chromium webbrowser and to set wish URL Chromium should show.

7. How to disable “Translate page”-dialog

I write in the beginning of this post that i dont going to get in to the page i was showing but there is a tip i like to give, i was getting a “Translate page”-dialog everytime i rebooted the Raspberry Pi.

The only way i find that worked for me was to add a meta tag in the html code to disable it:

<meta name="google" content="notranslate">

Now we are done

Now you have a working Raspberry Pi that on startup shows a website in chromium full screen (kiosk mode).

Reboot the raspberry pi and let it run.


Auto run on Scum and other games

After started playing Scum i was looking for autorun function and didnt find any in the game so i start reasearch and find a software called AutoHotKey that you can make a script file doing macros.

So i look in to it and write this this script that makes when i press one of my mouse side buttons its hold in W and when i click again its stop holding it.

All you need is to download and install AutoHotKey and create a file on example the desktop called “Press W toggle.ahk” or what you like it the have.

And open the file in example notepad and paste in this code:

XButton1::
If GetKeyState("w")
Send {w Up}
else
Send {w Down}
Return

And save the file, every time you go in to the game double click on that file and its shows a green icon with the clock with a white H on it, then its running the script.

Then go in to the game and when you like to auto go or run press the mouse side mouse button.

What you need to know is that you can not alt+tab out to other windows becouse then it stops and start write W on the place you put your mouse marker.w

VMware ESXi 6.0 and PCI Express S-ATA card that not are supported

I have put together my old file server hard disks to my old computer and put together a good server where i install VMware ESXi 6.0 and it didnt find my disk i haved plugged in on the PCI Express S-ATA card.

After some searching i find someone that make it possible to install som unsupported stuff to get the PCI Express S-ATA card to work with this commands below and a restart all worked good.

esxcli software acceptance set --level=CommunitySupported

esxcli network firewall ruleset set -e true -r httpClient

esxcli software vib install -d http://vibsdepot.v-front.de -n sata-xahci

Install Domoticz on Raspberry Pi 2 Model B

  • Install latest Raspbian on a micro sd card
  • Enable SSH by put a file named ssh without any file extension in the boot partition on the micro sd card, content has no matter.
  • Startup the Raspberry PI and connect to SSH
  • Install Domoticz by running the following command: sudo curl -L install.domoticz.com | bash

For some reason i didnt get Domoticz to work after this i got some error when trying to run ./domoticz about libssl so i search and search on google and find that i needed to make this stuff:

  • Run this commands to update Raspbian packages: sudo apt-get update && sudo apt-get upgrade
  • Update Domoticz to latest beta with this commands: /home/pi/domoticz/updatebeta
  • Open webbrowser on the raspberry pi ip number and port 8080 and start configure Domoticz


The Things Network – A Global IoT network

Me and my friend Christoffer has looking into some Internet Of Things stuff and one of the biggest problems with get “things” on to the internet is that its cost many and battery.

Now we find a way to do it sheep and battery low using, with the community driving “The Things Network”.

Together a community of people all around the globe building gateways and letting people connect to there gateways to send small amount of data to the the network.

All data is encrypted so the gateway owner only seeing package of data delivered but not what it sent.

I was the first person in Nyköping to put up a gateway for this “The Things Network” using a Pycom LoPy unit that talks LoraWan, Wifi and Bluetooth.

The Things Network using LoraWan to talks to units, in Europe with a frquency of 868 MHz and the gateway also connects to the wifi to get conenct to internet and the network.

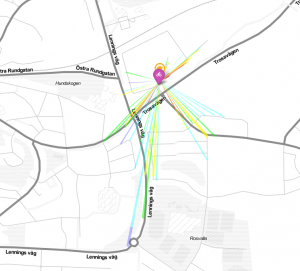
Then i have a another Pycom Lopy i setup as a node and have going around the apartment and scanning of how long the conneciton works. Really good i most say, here is a signal map:

The next step in ths project is to make the node sendning out events from a magnetic sensor that i like to add on my door to know when the door opens and closes and maybe another sensor on the mail inbox.

On tip, after follow the “Get started” tutorials and the node don´t like to join the network but the node is conencted tot he gateway and only sending  activating requests.

Then open up the port 1700 with both TCP and UDP to the gateway ip-number.

Microsoft Exchange Server 2016 shell commands that can be good to know

List all mailbox databases in the organisation
Get-MailboxDatabase

List all mailbox databases with paths
Get-MailboxDatabase | fl Name,EdbFilePath,LogFolderPath

List all mailbox databases with informations about them
Get-MailboxDatabase -status | fl *

Show mailbox databases and the backup status
Get-MailboxDatabase -status | ft server,name,LastFullBackup,LastIncrementalBackup,DatabaseSize

Change name of a mailbox database
Set-MailboxDatabase “Mailbox Database 1721414988” -Name “DB02”

Change database and log ptah of a mailbox database
Move-DatabasePath DB02 -EdbFilePath M:\DB02\DB02.edb -LogFolderPath N:\DB02

Change the queue and queue log path
Create the directories, example:

  • mkdir “Q:\Program Files\Microsoft\Exchange Server\V15\TransportRoles\data\Queue”
  • mkdir “R:\Program Files\Microsoft\Exchange Server\V15\TransportRoles\data\Queue”

Give “Network service” full control of this directories.
Open the file %ExchangeInstallPath%Bin\EdgeTransport.exe.config in notepad
Change the paths on the rows looks like below

  • <add key=”QueueDatabasePath” value=”Q:\Program Files\Microsoft\Exchange Server\V15\TransportRoles\data\Queue” />
  • <add key=”QueueDatabaseLoggingPath” value=”R:\Program Files\Microsoft\Exchange Server\V15\TransportRoles\data\Queue” />

After this changes you need to restart the transport service

Move system mailboxes to a new mailbox database
Get-Mailbox -Arbitration | New-MoveRequest -TargetDatabase DB02

Clean up completed move requests
Get-MoveRequest -MoveStatus Completed | Remove-MoveRequest

Show all e-mail accounts/recipients with e-mail addresses
Get-Recipient | Select Name, EmailAddresses

Show all mailboxes in a mailbox database
Get-Mailbox -Database “Mailbox Database”

Show the mail queue
Get-Queue

How to make a unattended uninstallation of Microsoft Exchange Server 2016?

I was running the uninstallation of a Microsoft Exchange Server 2016 and the server crash and reboot.

After the reboot i try to start the uninstallation again and only got “An incomplete installation was detected. Run setup to complete Exchange Installation.”

When try to run the setup from the installation DVD/ISO it not starts so i search for help and find out that i could start a unattended uninstallation by starting a Command prompt as adminsitrator and go to where the setup.exe file is on the DVD and then run the command:

  • Setup.exe /mode:Uninstall /IAcceptExchangeServerLicenseTerms

Then it start running “Welcome to Microsoft Exchange Server 2016 Unattended Setup”.

How to force removal of Exchange Server Mailbox database?

I have got some problems with one of my mailbox databases on my Microsoft Exchange Server 2016 server, its has been corrupt for some months without me could repair it and now it was time to remove the whole Exchange server from the organisation.

So i tested everything and search for some help and after some time i find out that you can force the removla of a exchange server mailbox database from the ADSI Edit tool.

Practical you telling the AD to remove the knowledge of the database with this hack.

  • Start with log on to the Domain Controller
  • From the start menu select run and enter adsiedit.msc and press run button.
  • In the tool, right-click ADSI Edit and select Connect to.
  • In the “Connection Settings”-dialog under “Select a well known Naming Context” select Configuration and click OK.
  • Navigate to CN=Configuration [domain] → CN=Services → CN=Microsoft Exchange → CN=[organization] → CN=Administrative Groups → CN=Databases
  • Identify the Mailbox Database containers that you like to remove and delete them.

Make sure that you are not deleting working mailboxes from the list, if you delete any by mistake you will have to delete & recreate the entire user using Active Directory Users & Computers.

How to activate SSH on Rasbian for Raspberry Pi from first boot?

I have a Raspberry Pi Zero Wireless that i have got to connect to my wifi direct on first bott (see this post) and then i liked to get the SSH activated from the first boot also.

After some searching i find out that you can put a file named ssh without any file extension in the boot partition.

Raspbian then going to activate SSH on the first boot so no need to put in any keyboard and monitor to activate it.

The content of the file doesn´t matter, it could contain either text or nothing at all.